1 . Research the Glyn Johns technique of recording drums. Write up in word press.
Gabe Steelman. (2011). The Glyn Johns Drum Recording Method.Available: https://www.recordingrevolution.com/the-glyn-johns-drum-recording-method/. Last accessed 19/12/18.
Who Is Glyn Johns?
Glyn Johns is a british musician, engineer, and producer who most notably worked with Led Zeppelin, The Who, The Rolling Stones, The Eagles, Eric Clapton, and even started his career assisting for The Beatles. He really made a name for himself in the annuls of recording legend with his monstrous John Bonham drum sounds on all those Zeppelin records. And the kicker…he only used 4 microphones to do it!
Specifically all you need for this method are 2 overhead mics (ideally large diaphragm condensers), one kick mic (dynamic or condenser), and one snare mic (usually a dynamic). The big picture is that the sound comes from the overheads while the kick and snare mics act as “spot” mics to fatten up those two huge elements of the kit and give you a bit more to mix with.
But before you think this is nothing special, you have to realize that the way these two “overhead” mics work together is very unusual and is part of what makes the Glyn Johns method so interesting. Let’s take a look…
It Starts With One Mono Overhead
If you saw last week’s post on makeshift acoustic treatment then you may have noticed the positioning of my drum overhead mics. We used the Glyn Johns method on the drums for this project and it really worked well.
The method starts with taking your first overhead mic and placing it about 3 to 4 feet directly above the snare (or middle of the kit). It should be pointing down at the kit. Record a little bit and listen back to that one mic. You are listening for a complete balance of the kit. You want to hear a nice blend of snare, toms, and cymbals all in one mic. If you have don’t have enough of the hi and mid toms, then angle the overhead a bit towards the toms. If the cymbals are too abrasive, move the mic up a bit more. Rinse and repeat.
Now For Something Completely Different
Once you have a good balance of the kit with your first mic, things get a bit interesting. Take your second overhead mic and place it just to the right of your floor tom, maybe 6 inches above the rim and facing across the the tom towards the snare and hi hat. As you can see this “overhead” mic isn’t overhead at all, rather it is a side fill mic capturing the kit from a different perspective.
The key to getting this mic in phase with your first overhead mic is to make sure that the grill of the micrphone is exactly the same distance from the center of the snare as the first overhead mic. Simply take a mic cable, have your drummer hold one end of it firmly to the center of the snare as you stretch the cable up to the first overhead and pinch off the distance. Then with your drummer still holding his end firmly to the snare, swing the cable over to the second mic and make sure that mic is lined up with where you are pinching it.

When panned, these two microphones alone should give you a completely balanced, clear, and punch stereo recording of your kit. You should hear the crack of the snare in the center, cymbals all around, and toms punchy and clear. What you will however lack is some obvious low end punch to the kick and some fatness to the snare. That’s where the final two spot mics come into play.
Kick And Snare To Round Things Out
With your overheads sounding good, things get simple. Grab your kick mic and place it close to the resonant head or inside the drum. Place it where you get that fullness and attack that you want to compliment your first two mics. With the snare, place your mic a couple of inches above the rim angled across the snare. Experiment with the angle of this mic for big differences in sound. Adjust these two mics to taste to round out your drum sound. Remember, you already will have the kick and the snare in your overhead mics to some degree so these two close mics should bring what is missing from that initial sound.
Final Thoughts To This Method
Some things to keep in mind with the Glyn Johns method (and really with any method of recording drums):
- New drum heads (beater and resonant) are a must to getting the best tones out of your kit.For not much money new heads can guarantee dramatically better drum recordings.
- Where you record really affects the sound. To get that classic big Bonham drum sound that Johns was made famous for you need to record in a big sounding room. Of course even in a smaller space, you can get a great sound. The better the room sounds though, the better your recordings will sound.
- There are no rules.Use this method as a starting point for your recordings if you like. But move things around, experiment, change it up. Rumor has it that this method was discovered by accident anyways, so don’t be afraid of “screwing things up”.
- Research the X&Y technique for recording drums. Write up in word press
Nantho . (2017). The ultimate guide to audio recording. Available: https://en.audiofanzine.com/recording-mixing/editorial/articles/recording-drums-overheads-the-XY-and-mid-side-techniques.html. Last accessed 19/12/18.
The XY technique

The XY technique makes use of a two paired cardioid microphones. The idea is to place the two capsules of the mics as close as possible to get an angle between 90 and 135 degrees (see diagram). The larger the angle, the wider the stereo effect. Do note that when the mics are placed like this the left mic captures the sounds coming from the right and vice versa.
To record the overheads you only need to place the mics above the kit, right between the kick and the snare, so that these elements are not too off center. Be careful with the height though: if you place the mics too high you risk them pointing towards the outer end of the kit, which might result in you getting more room sound than “direct” sound, with all the elements off axis.
The XY technique is certainly the easiest to implement. Besides, it offers a great mono compatibility, given the proximity of the capsules. The flip side is that the stereo image you get isn’t the widest. So if you want to get a larger than life sound, you’ll need to consider another method.
- Research different ways of recording acoustic guitar
MXL. (2017). 7 Critical Tips On How To Mic An Acoustic Guitar.Available: http://www.mxlmics.com/blog/?p=1230. Last accessed 19/12/18.
7 Critical Tips On How To Mic An Acoustic Guitar
There are many ways to record an acoustic guitar to get a wide range of different sounds, but no matter which techniques you use — and how many mics are involved — here are some things to keep in mind:
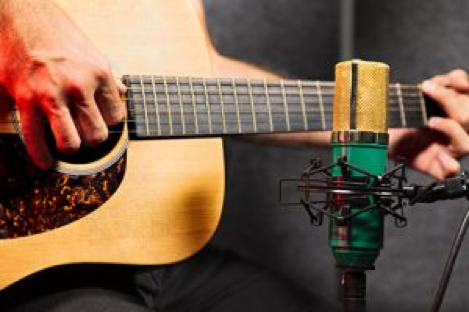
- Do not place the microphone directly in front of the sound hole.

This may seem like the most intuitive place to put a mic for an acoustic guitar, but the sound hole is like a fire hose for sound waves. Any mic placed directly in front will have all detail washed out by the gushing bass frequencies that come blasting out through the sound hole.
- For a balanced sound that captures high end, place the mic about 12 to 16 inches away from the 12th fret.

The “money spot” for acoustic guitar recording. This area just off the sound hole going towards the neck provides the microphone with a balanced tone that’s not washed out by bass and enables it to pick out more fretted string detail. This position is the most reliable way to capture a pleasing sound that’s true to the tone of the instrument.
[pictured] The MXL CR89 is a great large diaphragm condenser microphone for recording acoustic stringed instruments like guitar.
- For a balanced sound that adds a little more bass, try positioning the mic a little above the sound hole or behind and below the bridge.

If you want to add a little more power to your sound without washing it out with bass, move it back down the guitar. By placing the mic above the sound hole about 12 to 16 inches away, the sound will feel slightly fuller.

Positioning the mic behind and below the bridge, angled toward the player’s hand, will produce a similar effect. This position picks up slightly less bass, and not as much fretted string detail, but has a nice clear mid range. This bridge position will also capture more of the pick sounds when strumming.
[pictured] The MXL 990 condenser microphone is a high-quality and economical all-around mic for vocals and instruments.
- Experiment with different-sized condenser mics, and even some dynamic mics as well.

Generally speaking, most sound engineers use condenser mics for acoustic guitar because of their higher sensitivity, but for certain types of guitars, dynamic mics may fit better. It really all depends on the type of sound you’re looking for. For condenser mics, small diaphragm and large diaphragm mics will produce different sounding textures, with large diaphragms tending to be a little more expressive, and small diaphragms a little truer to the sound of the guitar. Try out as many different kinds of mics as you can in multiple locations to get the sound you’re after.
[pictured] MXL manufactures a range of large and small diaphragm condenser mics as well as live dynamic mics to capture an ideal sound for any acoustic guitar setting. From left to right, the MXL CR89, LSM-5GR, LSM-3, CR21, and MXL Genesis Tube Mic.
- Try the XY technique for a stereo sound and give more options to your mix (just watch out for phasing issues).

Bringing another mic into the session can double the fun, but you have to be careful to line them both up correctly. The classic XY position gives you two signals to blend and EQ in the mix. You can place the mics close together, or spaced apart, and you can experiment with different locations. Typically engineers will use the spaced out formation, with one mic near the “money spot” by the 12th fret, and the other by the bridge.

It is also common to place the mics very close to each other, even on top of each other, to get a stereo recording from a select location.

But the main thing to remember is to position each mic at the exact same distance away from the guitar. Otherwise, the sound waves hit each mic at slightly different times and produce phase complications that can muddle the sound.
[pictured] The MXL CR21s and 603s are two small diaphragm instrument mics that work great for the XY recording technique.
- Don’t be afraid to try a little mid-side action.

If you’ve got a handle on the XY technique and your favorite mic positions dialed in, the mid-side recording technique can be a fun challenge to take your recording capabilities to the next level. The mid-side technique requires a single cardioid mic placed directly on top of a figure-8 mic, with the cardioid pointed at the instrument and the side-address figure-8 perpendicular to the cardioid.
Once in the DAW, the figure-8 track is duplicated and the engineer pans and EQs each track to create a “widening” effect of the guitar between the speakers. The mid-side technique can really add definition and detail to your acoustic guitar recording, and it gives you a lot of options when mixing the instrument into a multitrack song. *One vital step to remember is to flip the phase signal on the duplicated figure-8 track in your DAW.
[pictured] The MXL R144 Ribbon Mic is an excellent figure-8 mic for the mid-side recording technique, as is the the MXL V67N working as the cardioid mic on top.
- If phase issues become insurmountable, try the single mic stereo trick in your DAW.
Simply record the guitar using your favorite mic in your favorite position, and then make two copies of the track in your DAW. Pan one to the right and put a highpass filter on the EQ to make this the “fretted string” sound, then take the other track and pan it to the left and put a lowpass filter on it to make it the “guitar body” sound. Keep the original track in the center, mix to your liking, and voila — you have a simulated stereo acoustic guitar sound.
- Research different ways of recording electric guitar.
Practical Music Production. (2018). Recording Electric Guitar. Available: https://www.practical-music-production.com/recording-electric-guitar.html. Last accessed 19/12/18.
Guitar Amplifiers
In basic terms, guitar amps are just speakers that are mounted into cabinets, either fully sealed or with an open back. Amps tend to have pretty poor high-frequency response, rolling off quite quickly around the 4-5 kHz mark. Open-back amps usually have a fatter sound to them with more present bass.
Guitarists tend to favor vacuum tube (valve) amps above other types. But nowadays they tend to be expensive, and the cheaper amp models are usually solid-state (transistor) designs.
Microphones
Shure SM57 dynamic mic

Because of the limited frequency response of guitar amps, dynamic microphones are usually used when recording electric guitar. The high volume levels of amps are also better suited to dynamics.
The best polar pattern to use would be cardioid (or super/hypercardioid), with omnidirectional being the next best choice. Generally speaking, if you’re going to record guitar through your amp with lots of other instruments in the same room, use a cardioid to minimize the spill.
If you only pick one mic to use, you can’t go wrong with a Shure SM57 or an SM58 – classic dynamic microphones that all home studios should have.
Microphone Placement
For best results, recording the amp in isolation is the preferred option as you don’t have to worry about potential spill from other sources.
A common mic technique for recording electric guitar is to use a dynamic mic up close to the amp’s grill with a condenser mic at a distance of around a foot. It gives you a nice combination of tone across two tracks, which you can mix together in your DAW.
But you must always remember to use the 3-to-1 rule when you’re recording with more than one microphone.
Any decent condenser microphone will do the job. I’ve had great success with the Audio-Technica AT2020 over the years.
The closer a mic is, the brighter and more intimate the recording will be. This brightness will also help the recording to cut through a mix better when compared to placing it further back, where the sound would be warmer but less sharp.
You can also change the tone by changing the direction of the mic. The sound will be brighter if the mic points towards the center of the amp’s speaker, becoming less bright the more you point it towards the edge of the speaker’s cone.

Open-backed Amps
A lot of small-to-medium sized guitar amps you find in home studios will be open-backed. You can combine two recording mics by placing one in front of the speaker and one behind, later combining them in your DAW during mixing.
But one thing you must remember to do is to invert the phase of the rear microphonebefore recording, so it’s in-phase with the front microphone. This is essential.
Recording Electric Guitar Direct
Recording guitar directly is also an option. A DI box lets you record the clean direct signal alongside the microphones, together during the same take. You can find out more about how to do that over on the DI box page, as well as how to re-amp your recordings.

With the spread of amp simulator software as well, like Guitar Rig and AmpliTube, recording the DI signal by itself lets you use these plugins to completely design your guitar tone after you’ve recorded.
Many guitarists don’t even bother recording real amps anymore. You can plug your guitar directly into your audio interface to get quick clean recordings for using with your guitar software.
- Research the Amen break

Andy Lee. (2015). 10 THINGS YOU NEED TO KNOW ABOUT: THE AMEN BREAK. Available: https://ukf.com/words/10-things-you-need-to-know-about-the-amen-break/10555. Last accessed 19/12/18.
The four bar drum loop known for arguably laying the foundation of D&B, hip-hop, jungle, and countless other genres, the Amen Break has recently become a hot topic of conversation following the sale of canny wood carving of the sine wave (pictured below) and the creation of a GoFundMe project aimed to finally start compensating The Winstons for their iconic contribution to music.
Originally sampled from Amen Brother, a funk update by the 1960s group The Winstons; The Amen Break reemerged after almost two decades of dormancy. Utilised for its 5.2 seconds of clean drums, Amen Brother and the Amen Break ultimately proved to be the catalyst behind a wave of sonic exploration.
Despite its widespread use, Richard L. Spencer and Gregory Coleman’s sample has remained relatively unidentified in the public eye. So this week, in honor of the Amen break, we hit the books to uncover 10 facts about the 5.2 second loop that started it all.

Once you hear it, it’s everywhere…
An omnipresent piece of pop culture’s soundscape, the Amen Break has been utilized as the sonic backdrop across all forms of advertising, marketing and commercial music. Truly independent of genre, the Amen Break can be notably cited in works from Slipknot, The Prodigy, Led Zeppelin, Nine Inch Nails, N.W.A, Squarepusher, and even the theme song to the animated sitcom Futurama. The Amen Break is the perfect example of the Baader-Meinhof phenomenon in action.
Amen Brother is The Winston’s Adaptation of Jester Hairston’s Original
Originally written for the movie Lilies Of The Field, Amen was ultimately popularized by The Impression’s folk gospel record of the same name and then adapted once more to create The Winston’s Amen Brother.
It was actually the B-side to a GRAMMY Award winning single
Amen Brother was originally released as the B-side to the 45RPM 7-inch vinyl single Color Him Fatherin 1969, which went on to win The Winstons a GRAMMY for best R&B song the following year.
The Amen re-emerged on Breakbeat Lenny’s Volume 1 of Ultimate Breaks and Beats
Ultimate Breaks and Beats (UBB) was a series of compilation albums released from 1986 to 1991 curated by Louis ” BreakBeat Lou” Flores. Featuring tracks that included many popular drum breaks that eventually became some of the most notable foundation beats such as the Apache break by The Incredible Bongo Band.
Way back on volume 1, the beat that had DJs and producers experimenting across the globe was, of course, the Amen Break.
It’s one of the tools behind the development of hip-hop… No big deal
With the advent of the sampler and turntable in the 1980s, artists resuscitated the 4 bar drum loop encouraged by the new found ability to cut, rearrange and ultimately contextualize each component of the break to create a completely new and unique composition. The Amen’s “clean” nature, made it the perfect candidate for experimentation, and the result has made lasting effects on pop culture’s sonic paradigm to this very day.
It also played a pivotal role in the development of jungle
Similar to hip-hop, by splicing the original 4 bar loop into each individual components: the snare, bass drum, hi-hats and crash symbol, the Amen break was effectively and more experimentally restructured to become the core of yet another new genre of music. Blending elements of reggae, heavy bass and high speed break beats, the result was the creation of jungle.
It helped The Prodigy achieve their first number one
Firestarter, the debut single from The Prodigy’s third album, was bolstered by the Amen Break and helped the group achieve their first number-one single on the UK Singles Chart…
Even David Bowie has embraced the Amen Break
As the Amen Break began to thrive in the underground electronic scene and hip-hop, UK songwriter, multi-instrumentalist and all-round legend David Bowie took his first stab at incorporating the break into one of his records; Little Wonder.
The most championed record off of his 1997 album, Earthling, Little Wonder utilised the tenants popularizing electronic acts such as The Prodigy, and transformed tools within the context of the pop culture standard.
In addition to being heavily bolstered by the Amen Break, the lyrics of Little Wonder also rather inventively allude to all seven of the dwarfs from Walt Disney’s classic film, Snow White. Despite being the crowd favorite off of the album, David Bowie and the Amen Break failed to break the top 10 of the UK charts, achieving a peak charting position of 14 throughout the year.
It’s speculated to follow Ancient Greece’s Golden Mean
Despite its audible impact on music, author and mathematician Michael S. Schneider, has proposed that the Amen Break has been so instrumental in the development of music because it has properties of the geometric Golden Mean… The ancient Greek philosophy describing the desirable middle between two extremes, the essence of truth and beauty.
While it’s an interesting theory, there’s also a very strong counter-argument. Since its original publish date, Michael Schneider’s speculator hypothesis of the Amen Break following the Golden Mean has been thoroughly investigated. Studies continue to question the integrity of Schneider’s analysis. For a deeper read into the counterpoint of Mr. Schneider’s hypothesis read more here.
It highlights the dramatic shift in intellectual-property rights in the music industry
Now, on any given day in electronic music, it is not uncommon to encounter at least one DMCA takedown or broken link due to copyright infringement. However, since its original release in 1969 and continued universal presence across all forms of music, the creators of the Amen Break have never received royalties or controlled the use of their sample. In many ways the Amen break initiated the necessary paradigm shift of controlling and monitoring plagiarism within the music industry; however it’s stifling to imagine that if this immortal sample had been controlled, D&B, hip-hop and countless other sample based genres of music would not exist in the same sense that they do today.
